In the dynamic world of cybersecurity, challenges keep us sharp, building our problem-solving skills and technical prowess.
If you don’t know what is PicoCTF, you can start from here.
Today, we’re venturing into the heart of one such engaging puzzle – the PicoCTF ASCII FTW challenge.
Using Ghidra, the powerful software reverse engineering tool, as our primary weapon, we’ll dive deep into ASCII intricacies, Ghidra scripting, and challenge-solving strategies. Whether you’re a seasoned code-breaker, a cybersecurity enthusiast, or a curious newcomer venturing into the realm of capture-the-flag (CTF) challenges, this guide is designed to pique your curiosity, sharpen your skills, and inspire you to conquer. So, fasten your seatbelts as we embark on this thrilling code-cracking journey!
Understanding ASCII: The Language of Computers
ASCII, an acronym for the American Standard Code for Information Interchange, is an integral aspect of computing and digital communication. It’s a character encoding standard that acts as a bridge between human-readable text and the binary language of 1s and 0s that computers understand. Without ASCII, the text you read on screens, from web pages to PDFs, wouldn’t exist!
When you press a key on your keyboard, ASCII translates that key into a 7-bit binary code that the computer can process. For instance, the ASCII value for ‘A’ is 65, which translates to 1000001 in binary. This standardization allows for consistent data exchange across various devices and platforms, regardless of the underlying architecture.
In our PicoCTF ASCII FTW challenge, we’re delving into the world of hex ASCII values. Each ASCII character has a hexadecimal representation – a number in base 16 rather than base 10. For instance, the ASCII value 65 (‘A’) is 0x41 in hexadecimal. These hexadecimal representations hold the secret to unveiling the flag text in our challenge.
Introducing Ghidra: Your Powerful Ally
Let’s familiarize ourselves with a tool that’s no stranger to the Stackzero community – Ghidra. As some of our loyal readers might recall from our previous walkthrough of the “Hurry Up & Wait” PicoCTF challenge, Ghidra is a formidable tool when it comes to software reverse engineering (SRE). Developed by the National Security Agency’s (NSA) Research Directorate, Ghidra has earned its reputation in the cybersecurity arena with its powerful capabilities and open-source nature.
At its heart, Ghidra is a disassembler. It can deconstruct compiled programs, translating the often convoluted machine code into a format that we, as humans, can comprehend. From decompilation to scripting and multi-user collaboration, Ghidra’s expansive features make it a versatile and potent tool.
A noteworthy aspect of Ghidra is its interactive graphical user interface (GUI). It presents a visual layout of the binary’s structure, including flow graphs for the binary’s functions. This visualization feature simplifies code navigation and makes understanding the underlying structure significantly easier.
Another impressive attribute of Ghidra is its broad support for multiple processor instruction sets and executable formats. Whether you’re dealing with an x86 Windows binary or an ARM Linux executable, Ghidra has got you covered.
In our journey through the PicoCTF ASCII FTW challenge, Ghidra plays a critical role. Its disassembly feature allows us to scrutinize the provided ELF file, shedding light on the program’s inner workings and, subsequently, the concealed flag.
Of course, as we demonstrated in our Hurry Up & Wait challenge walkthrough, Ghidra’s scripting capabilities significantly elevate its utility. With scripting, we can automate many tasks, enhancing efficiency and allowing us to focus on the more strategic aspects of the challenge. Ghidra supports scripting in several languages, including Python and Java, accommodating a range of skill sets and preferences.
So, with Ghidra as our companion, we’re well-prepared to tackle the PicoCTF ASCII FTW challenge and unlock its secrets.
Downloading and Understanding the ELF File
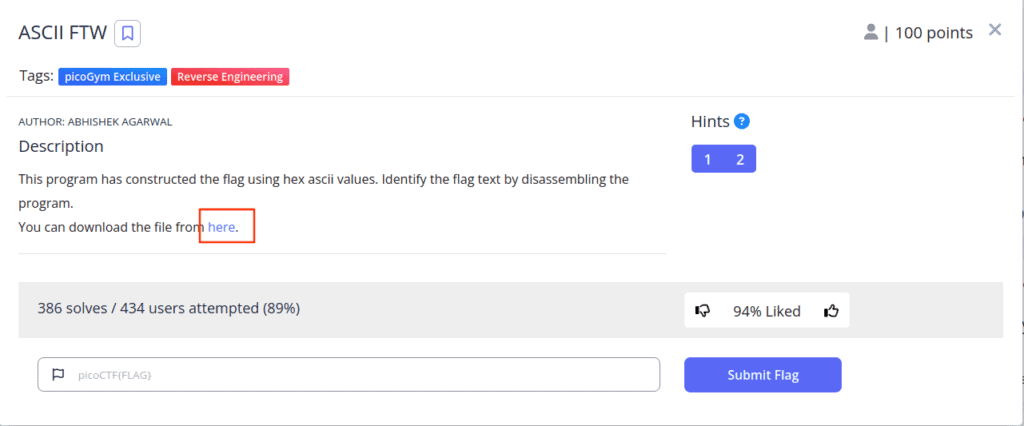
Before we can start unravelling the mystery of the PicoCTF ASCII FTW challenge, we first need to get our hands on the essential “asciiftw” ELF file. This file is readily available for download via the provided challenge link. You can locate this link in the challenge description. Here’s a screenshot that highlights the link for a clear visual reference:

Once you’ve clicked on this link, the ELF file should start downloading automatically. Save it to a convenient location, as we’ll be using it extensively throughout this guide.
ELF, or Executable and Linkable Format, is a common binary file format that holds programs or software libraries, primarily for Unix-like operating systems. By interpreting this code correctly, we can uncover the flag – the treasure we’re after in this challenge.
Understanding the ELF file is crucial as it offers us insights into how the program operates and, ultimately, clues on how to decipher the flag. The ELF file contains everything the system needs to prepare a program for execution, including machine language instructions, memory arrangement, and program entry point.
However, these files aren’t readily decipherable by humans – they’re written in binary, a language made of 1s and 0s that machines, not humans, understand. This is where our powerful ally, Ghidra, comes into play. By using Ghidra, we can translate this machine language into something we can comprehend and analyze.
So, with the ELF file safely downloaded and a basic understanding of its role, we’re ready to start cracking the code of the PicoCTF ASCII FTW challenge.
Setting Up and Navigating Ghidra
If you haven’t yet added Ghidra to your software toolkit, it’s time to rectify that. As we’ve established, Ghidra is a powerful ally in tackling the PicoCTF ASCII FTW challenge, so having it ready is paramount. This guide assumes that you’re running Kali Linux, a favourite among cybersecurity enthusiasts due to its pre-installed suite of security tools. If you need assistance with setting up Kali Linux, refer to our detailed tutorial on How to Install Kali Linux on VirtualBox in a Few Minutes.
Installing Ghidra on Kali Linux is straightforward. Open up your terminal and execute the following command: sudo apt install ghidra.
After the installation process finishes, you’ll find Ghidra located in your main menu under the ‘Reverse Engineering’ section.

With Ghidra now installed, it’s time to become comfortable with its user interface. Ghidra’s UI is intuitively designed to facilitate efficient reverse engineering tasks. Understanding the various tools and panels in Ghidra will equip you with the skills required to deftly navigate the PicoCTF ASCII FTW challenge.
Spend some time exploring the different functionalities Ghidra offers. Familiarize yourself with the program tree, the listing (code browser), and the data type manager. Understand the roles of the symbol tree, the function graph, and the function call graph. Learning to switch between these and knowing where to find the information you need can greatly speed up your progress.
By getting comfortable with Ghidra’s interface and features on your Kali Linux system, you’re setting the groundwork for a smoother, more efficient reverse engineering process. With this preparatory step out of the way, we’re ready to delve into the challenge and uncover the flag hidden within the ASCII characters.
Dissecting the ELF File with Ghidra
With Ghidra ready to roll, it’s time to import the “asciiftw” ELF file and start the disassembly.
Doing that implies creating a new project and analysing it as we did in the article Hurry Up & Wait challenge walkthrough.
Ghidra will work its magic, deciphering the machine code into assembly language. Within this translated code, look out for hex ASCII values – these are your keys to unlock the flag text.
Once you identify these values, it’s merely a matter of converting them into text to discover your flag.
The process we are going to follow is the following:
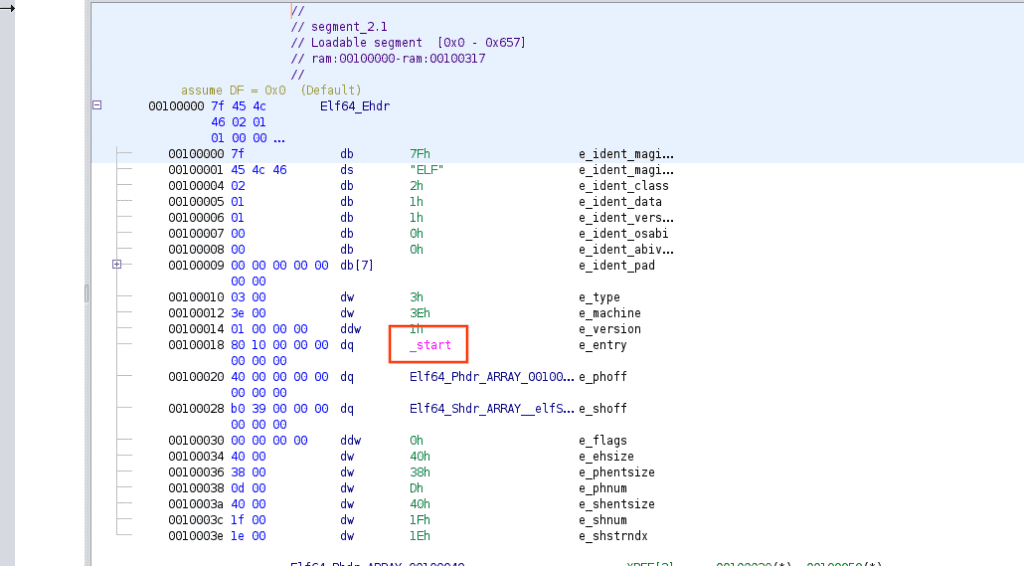
Firstly we need to lookup the main function, so from the starting screen let’s click on _start

so after a brief application setup, we can see a call to the main

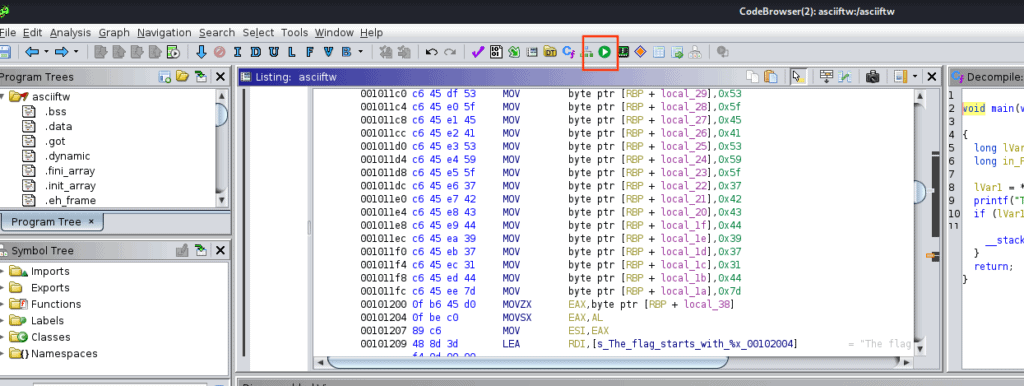
we can click on it and it will move us to the main function that contains a lot of move statements plus a call to the print

First, we need to understand how arguments are passed in a program. For that, we use something called calling conventions (if you don’t know what they are check this article). In the case of a 64-bit Linux system, the first argument goes into a register called RDI, and the second one into RSI. In RDI, we find a pointer to the format string. Meanwhile, in RSI, we find a pointer to RBP – 0x38, which is where our flag string starts!
Now, we could manually convert these values from hexadecimal to string. But that’s a slow process, especially in real-world scenarios where we might have a lot of data. So, even though it’s not needed for this task, I want to show you a faster way. We’re going to use a Ghidra script, which will help you become more efficient and confident!
Automating the Process with Ghidra Scripting
In this section, we dive into Ghidra scripting. It’s like a shortcut that saves us time and makes things more efficient. Ghidra supports multiple languages, so whether you like Python or Java, you can use it here. And don’t worry if you’re new to scripting. Ghidra is really helpful and easy to understand.
To start, let’s open the Script Manager. It’s a green circle with a white triangle inside.

Then, we create a new script!
I’ll show you the complete code first. After that, I’ll explain each part of it.
from ghidra.program.model.mem import MemoryAccessException

start_addr = currentProgram.getAddressFactory().getAddress("00101184")
end_addr = currentProgram.getAddressFactory().getAddress("001011fc")

byte_list = []


current_addr = start_addr
while current_addr <= end_addr:
	instruction = getInstructionAt(current_addr)
	if instruction is not None:

		operand = instruction.getOpObjects(1)[0] # get second operand
		byte_val = operand.getValue() & 0xFF # convert to unsigned byte
		byte_list.append(byte_val)


        current_addr = current_addr.next()

flag = list(map(chr, byte_list))
print("Flag:", "".join(flag))
The Script Analysis
I’ll break this down into simple steps:
- Importing required modules: At the beginning of the script, the
MemoryAccessExceptionmodule is imported fromghidra.program.model.mem.
This module is useful to handle memory access errors in Ghidra.from ghidra.program.model.mem import MemoryAccessException - Defining the address range: Defining the starting and ending addresses for the data extraction. These addresses point to the memory’s places of the ASCII data of interest.
start_addr = currentProgram.getAddressFactory().getAddress("00101184")end_addr = currentProgram.getAddressFactory().getAddress("001011fc") - Creating an empty byte list: An empty list named
byte_listis created. This list will hold the ASCII values retrieved from the specified memory range.byte_list = [] - Iterating through the address range: The script starts iterating through each memory address from
start_addrtoend_addr. It retrieves the instruction present at each address using thegetInstructionAt()function.while current_addr = start_addr while current_addr <= end_addr:instruction = getInstructionAt(current_addr) - Checking if the instruction is present: For each address, it checks if an instruction exists. If it does, it proceeds to the next step.
if instruction is not None: - Getting the second operand: If an instruction is present, it retrieves the second operand of the instruction using
instruction.getOpObjects(1)[0]. This represents the ASCII value of interest.operand = instruction.getOpObjects(1)[0] - Converting the operand to an unsigned byte: The operand is converted to an unsigned byte and stored in
byte_val.byte_val = operand.getValue() - Appending the byte to the list: The byte value is then appended to the
byte_list.byte_list.append(byte_val) - Advancing to the next address: After extracting the byte value from the current address, it moves to the next address in the range.
current_addr = current_addr.next() - Converting bytes to characters: Once all bytes have been extracted, the byte values are converted to characters using the
map()function and thechr()function. The results are stored in theflaglist.flag = list(map(chr, byte_list)) - Printing the flag: Finally, the script joins all characters in the
flaglist into a string and prints it.print("Flag:", "".join(flag))
Running the Ghidra Script
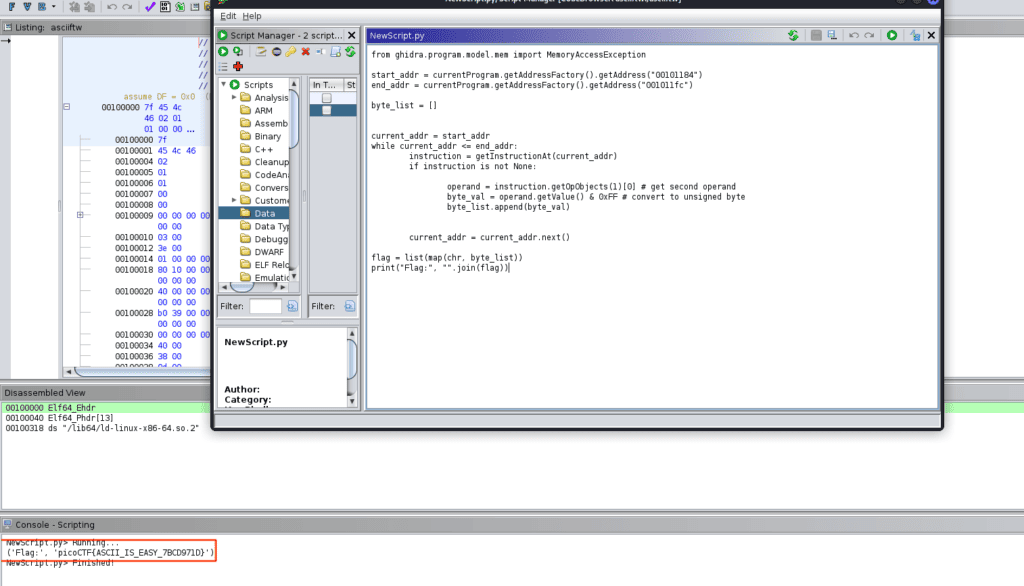
What this script does is, it takes ASCII values from a specific part of a binary program, turns them into characters, and then prints the resulting string. After running it, this is what we get!

Our final flag is picoCTF{ASCII_IS_EASY_7BCD971D}.
All that we have to do is to put this flag into the picoCTF input field. And just like that, the challenge is complete!
Conclusion
That’s all, folks! By reaching the end, you’ve cracked the PicoCTF ASCII FTW challenge, but more importantly, you’ve unlocked a deeper understanding of ASCII and Ghidra. You’ve also discovered how scripting can make your life a lot easier. These skills and insights are super valuable, not just in cybersecurity, but in many other areas too.
What you’ve learned today is just the beginning. So stay curious and keep learning. Don’t be afraid to take on new challenges and dive deeper into the amazing world of coding.
Here at StackZero, our mission is to build a community that’s proactive, competent, and passionate about learning. We believe in understanding mechanisms deeply, not just solving challenges.
So why not join us? Follow StackZero.net and our social profiles to keep up with new challenges, learn more, and become part of our growing community. Here’s to cracking many more codes together. Happy hacking!


